
Once the contractor has chosen siding materials that align with your vision and contract specifications, they will order them. This process can take anywhere from a few days to a couple of weeks.
Before installation day, it’s helpful to remove items like plants, toys, barbeques, and shelving to reduce the risk of damage. It’s also a good idea to tie back any shrubbery that’s close to the walls. Contact Siding Installation Murfreesboro TN for professional help.
The cost of your siding replacement will depend on a variety of factors. The material you choose will influence the price, while your home’s size and layout will affect labor and installation costs. Additionally, the availability of certain upgrades and extras may increase your project price tag.
One of the most important considerations when choosing a siding material is its durability. Durable options like vinyl and fiber cement can save you money in the long run by reducing future maintenance expenses. Our handy tool allows you to get estimates based on average industry costs and your specific zip code.
Another factor that influences the cost of your siding is its energy efficiency. Insulated siding, such as vinyl and fiber cement, keeps homes cooler in summer and warmer in winter, lowering energy bills. This added benefit often makes these materials more expensive than other types of siding, but can add up to substantial savings over the lifetime of your home.
While it’s possible to replace your siding on a DIY basis, we don’t recommend it unless you have extensive experience with home improvement projects or are prepared to pay for costly mistakes that could lead to moisture damage, energy loss, and voiding of your warranty. If you hire a professional contractor, you can count on quality work and expert installation.
To ensure that you’re getting the best value for your money, make sure to compare prices before hiring a contractor. Look for certifications, and make sure that the contractor has workers’ compensation and liability insurance. Also, be sure to consider extras such as removal of existing materials and the need for permits.
You can lower your overall project costs by scheduling the replacement during off-peak seasons. This is when contractors are more likely to offer discounts and specials. You can also find better deals on siding materials and labor during these periods.
Materials
With siding costs on the rise, it is important for homeowners to understand what factors will impact their project’s total cost. In addition to material and labor, homeowners should also consider permit fees, removal of existing siding and necessary wall repairs. With careful planning, homeowners can avoid overpaying for their new siding and maximize the value of their investment.
The type of material chosen for the siding will play a significant role in overall expense. Vinyl, fiber cement and engineered wood tend to be budget-friendly options, while premium materials like brick, stone or stucco will add significantly to the overall cost. The size and design of a home may also influence price, as larger structures require more materials and labor than smaller homes.
A soffit is an area of space below or to the inside (if the building has a gable roof) of the rafters, often in the form of vents. The soffit is designed to protect the interior of the home from rain and other elements, while still allowing air circulation. The soffit is often constructed of wood, though metal and other materials are also used.
Often, the soffit will be covered with a sheet of plywood or similar material to provide additional protection against moisture damage and pests. For this reason, it is important to choose a good quality plywood or other water-resistant material for the job.
A trim piece used to mate courses of siding or soffit panels at a 90-degree outside corner. These pieces can be fabricated from wood or a variety of other materials, and typically have a slotted hole for fasteners.
A specialized power saw with a fine-tooth blade can help speed up the cutting process for most siding installations. However, a standard handsaw can also be used if the homeowner wants to save money on the purchase of a new power tool. When using a power saw, it is recommended to install the blade backwards for a cleaner and safer cut. A backwards-facing blade can prevent the risk of floor-plate compression, a problem that can result in buckled or distorted vinyl. It is also critical to use a water-resistant sealant on the cut edges of any exterior siding, as well as flashing at all windows and doors.
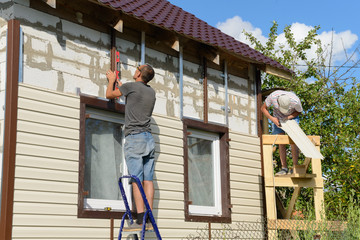
Installation
Professional installation services can be very beneficial to homeowners, especially those who are looking for a complete makeover for their home. They can help ensure that the materials are installed properly and match up well with any underlying structural components like soffits, fascia, and corner posts. They can also apply a weather-resistant barrier, house wrap, and J-channel to prevent moisture and improve insulation.
Before installing new siding, it is important to prepare the wall. This includes removing the existing siding, inspecting it for damage, and repairing any problems that are found. This step is important because it allows you to get a clean slate to work with, which can greatly improve the final appearance of the walls.
It is also a good idea to trim any shrubbery or trees close to the building. This will reduce the amount of debris and nails that need to be cleaned up afterwards. It is a good idea to wear safety equipment while working, including masks and eye protection. In addition, it is a good idea to have the proper tools for cutting, fitting, and nailing. A siding project can be messy, so it is best to plan ahead and be prepared for a little dirt and dust.
Once the wall has been prepped, it is time to install the first row of siding. Start at the back corner of the building and work towards the front, leaving a quarter inch gap for corner posts or window trim. Then, install a starter strip to the bottom of the wall, making sure it is level. Then, snap the first siding panel into the starter strip and nail it to the wall, being careful not to hammer the nails too far in.
Then, repeat the process for each additional row of siding. When you have finished, check the level of each section to be sure it is even and that there are no gaps or bubbles. Also, check for water-resistive barriers to prevent the intrusion of incidental rainwater and to ensure that all edges are sealed and caulked properly.
Maintenance
Many homeowners understand that certain components of their home require regular maintenance to keep them looking and functioning their best. This includes roofs, landscaping, appliances, and paint. However, few realize that siding also needs regular care to maintain its beauty and integrity. Proper vinyl siding maintenance can help you avoid costly repairs and maintain your property’s value.
Before beginning your maintenance schedule, be sure to discuss it with a siding professional. They will be able to provide you with a detailed plan that can help you save time and money. They will recommend products and techniques that are suited to your specific needs, as well as your property’s environment.
To begin, clean your siding regularly to remove dirt and grime. This will prevent damage to the surface, which can result in a deteriorated appearance and increased energy bills. If you notice any areas of damage, address them immediately to avoid further problems. You should also inspect your window sills and caulking on a regular basis for signs of mold or mildew. These should be replaced promptly to prevent water and pests from entering your home.
During the installation process, you should remove pictures and shelves from your walls to reduce the risk of them falling during the construction process. It is also a good idea to park your vehicles away from your house during the installation. This will make it easier to get in and out of your driveway, as well as minimize the chance that your vehicle will be damaged by loose debris.
After the installation of your new siding, it is important to maintain a proper acclimation period. This is a period of 10-14 days during which the wood will adjust to its surroundings and prevent warping, cupping, or buckling. This acclimation process can be accomplished using a carport, garage, or an open shed.
During this time, it is essential to keep pets and children inside your home, as the noise and commotion can cause them anxiety. Additionally, you should prepare your home for the installation by trimming your grass short and removing any items that are located close to the exterior of your home. This will ensure that your belongings do not become a tripping or fall hazard for the workers. You should also discuss with your contractor whether you need to remove shutters, downspouts, or any other exterior fixtures.

